Category Archives: System administration

ssh: “perl: warning: Setting locale failed”

Environment: CentOS 7.6.1810

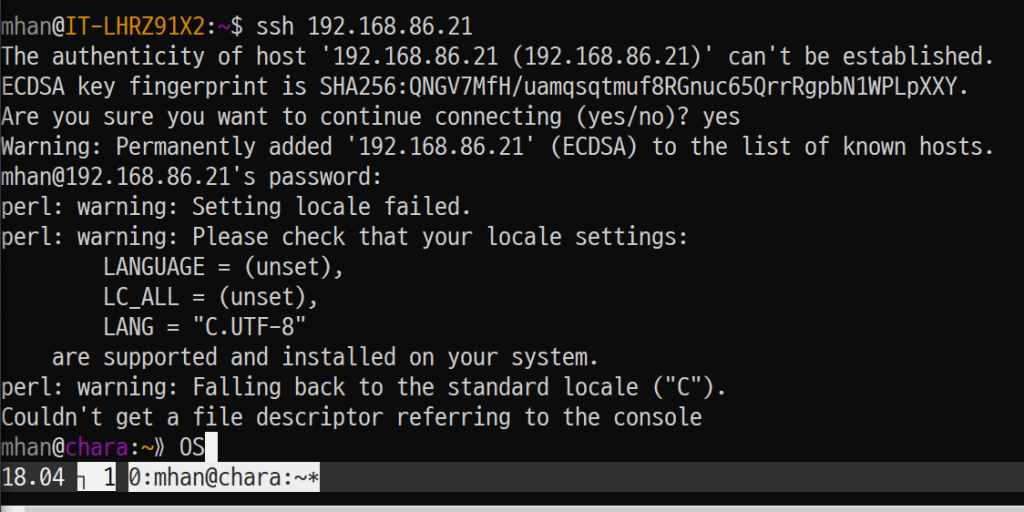
When logging in from a WSL console (Windows 10, v1809, Build 17763.615 + Ubuntu 18.04) into my CentOS box it seems to be complaining about locale settings.

perl: warning: Setting locale failed.
perl: warning: Please check that your locale settings:
        LANGUAGE = (unset),
        LC_ALL = (unset),
        LANG = "C.UTF-8"
    are supported and installed on your system.
perl: warning: Falling back to the standard locale ("C").

Screenshot:

According to this page, you can just add the following lines to /etc/environment file:

LC_ALL="en_US.UTF-8"
LC_CTYPE="en_US.UTF-8"
LANGUAGE="en_US.UTF-8"

Introduction to basic commands in PostgreSQL for MySQL users

Last tested on Ubuntu 16.04.01 LTS (xenial)

Getting into DB console.

MySQL:

$ mysql -uroot -p

PostgreSQL:

$ sudo su postgres
postgres@hydrogen:~$ psql

Creating DB

Creating a database and granting a user complete access.

MySQL:

mysql> create database mydb;
mysql> grant all on mydb.* to dbuser@localhost identified by 'mypass';

PostgreSQL:

postgres=# create user dbuser with password 'mypass';
postgres=# create database mydb;
postgres=# grant all privileges on database mydb to dbuser;

Listing DBs

You can list the DBs.

MySQL:

mysql> show databases;

PostgreSQL:

postgres=# \l

Selecting a DB

You can select a DB.

MySQL:

mysql> use mydb;

PostgreSQL:

postgres=# \connect mydb;

After selecting a DB you can go ahead and execute SQL commands.

Listing all tables

You can list tables in a DB.

MySQL:

mysql> show tables;

PostgreSQL:

postgres=# \dt

Change the password of a user

You can list tables in a DB.

MySQL:

mysql> set password for 'dbuser'@'localhost' = password('newpassword');

PostgreSQL:

postgres=# alter user "dbuser" with password 'newpassword';

Exiting from DB

Ctrl-D should exit from both.

Copying MySQL databases on the same server

Last tested on Ubuntu 16.04.01 LTS (xenial) with MySQL Ver 14.14 Distrib 5.7.13

We had to make a copy of existing databases for development app instances.  For example, a database called xp_main was for the production and xpdev_main would be for development. This depends on how date strings were created, but if you have a lot of dates in the records you may want to turn off the NO_ZERO_DATE mode.  If you don’t turn it off, the copying process can be interrupted. Go into your MySQL console.

mysql> select @@sql_mode;
+-------------------------------------------------------------------------------------------------------------------------------------------+
| @@sql_mode |
+-------------------------------------------------------------------------------------------------------------------------------------------+
| ONLY_FULL_GROUP_BY,STRICT_TRANS_TABLES,NO_ZERO_IN_DATE,NO_ZERO_DATE,ERROR_FOR_DIVISION_BY_ZERO,NO_AUTO_CREATE_USER,NO_ENGINE_SUBSTITUTION |
+-------------------------------------------------------------------------------------------------------------------------------------------+

As you can see NO_ZERO_DATE exists.  Copy paste the entire string w/o NO_ZERO_DATE.

mysql> set global sql_mode='ONLY_FULL_GROUP_BY,STRICT_TRANS_TABLES,NO_ZERO_IN_DATE,ERROR_FOR_DIVISION_BY_ZERO,NO_AUTO_CREATE_USER,NO_ENGINE_SUBSTITUTION';
Query OK, 0 rows affected, 1 warning (0.00 sec)
mysql> exit
Bye

Next, we will copy the database using mysqldbcopy utility.  You may need to install mysql-utilities package if you don’t have it available.

$ mysqldbcopy --drop-first --source=root:mypassword@localhost --destination=root:mypassword@localhost xp_main:xpdev_main
WARNING: Using a password on the command line interface can be insecure.
# Source on localhost: ... connected.
# Destination on localhost: ... connected.
# Copying database eh_bcbs renamed as ehdev_bcbs
# Copying TABLE xp_main.accesses
# Copying TABLE xp_main.accessflags
# Copying TABLE xp_main.activities
# Copying TABLE xp_main.activitytype_items
# Copying TABLE xp_main.encounter_goals
# Copying TABLE xp_main.files
# Copying TABLE xp_main.tester1_intake_subseqvisit_goals
# Copying TABLE xp_main.tester1_game_careplan_goals
# Copying TABLE xp_main.localgames
# Copying TABLE xp_main.roles
# Copying GRANTS from xp_main
# Copying data for TABLE xp_main.accesses
# Copying data for TABLE xp_main.accessflags
# Copying data for TABLE xp_main.activities
# Copying data for TABLE xp_main.activitytype_items
# Copying data for TABLE xp_main.encounter_goals
# Copying data for TABLE xp_main.files
# Copying data for TABLE xp_main.tester1_intake_subseqvisit_goals
# Copying data for TABLE xp_main.tester1_game_careplan_goals
# Copying data for TABLE xp_main.localgames
# Copying data for TABLE xp_main.roles
#...done.

That should do it!
Copying or moving all of MySQL databases

This is just one of the ways you can move all of the MySQL databases from one server to another.  This was tested on Ubuntu 16.04.01 LTS (xenial) distro.

Log in as an admin on MySQL Console and lock the database to allow only read operations.

mysql> flush tables with read lock;
mysql> set global read_only = on;
mysql> exit

Dump all of the databases into a file.

$ mysqldump --lock-all-tables -u root -p --all-databases > dbs.sql

Copy the dump to the new server. RSYNC is preferred over SCP, especially if the file is large.

$ rsync -tvz --progress dbs.sql mhan@newserver.com:~/files/
or
$ scp dbs.sql mhan@newserver.com:~/files/

The DB can be (optionally) unlocked. This may or may not be a good thing to do in your case. Do it at your own risk.

mysql> set global read_only = off;
mysql> unlock tables;
mysql> exit

On the new server, execute this command to import the new SQL dump.

$ mysql -u root -p < ~/files/dbs.sql

IMPORTANT: If your file is large, or you just have a lot of records, you may want to make sure you have something bigger than 16M for max_allowed_packet attribute in your my.cnf (usually found under /etc/mysql/ or /etc/mysql/mysql.conf.d/) on your new server where you’re doing the import, else the server could hang on a large insert operation and your MySQL server may actually decide to go away, literally.  On one of the servers I had it for 1024M just for this operation and brought it back low afterwards.

Recommended file permissions for WordPress

Private WordPress installations seem to be the drum that hackers like to hit on these days.  It seems that many themes are also vulnerable as well. I’m not saying this is the answer to mitigate hacking attempts, but merely as a starting point.  Anyway, as a starting point for fortifying a WP installation here are recommended file permissions settings for a WordPress installation on a Linux box.  These commands will set 750 for all folders, 640 for files, and 600 for wp-config.php file. Sitting with a root/sudo access on a parent folder from a WP installation folder (assuming wpfolder here).


# find wpfolder -type d -exec chmod 750 {} +
# find wpfolder -type f -exec chmod 640 {} +
# chmod 600 wpfolder/wp-config.php


You may also want to make sure that only wp-content folder is owned by www-data (or whatever your webserver may be using).

Adding sudoers

A file can be added for groups of users or specific users to /etc/sudoers.d/ directory. This line would make someone a sudoer with no password requirement.

jsmith ALL=(ALL) NOPASSWD:ALL

If you want the user to type a password.

jsmith ALL=(ALL:ALL) ALL

Updating sudoers file safely

  • Last checked on Ubuntu 16.04.01 LTS (xenial)

The command visudo checks the validity of the sudoers file before making the actual update to the file, and this is the recommended way of editing the file because one can potentially lose sudo privileges unintentionally.

$ sudo visudo

Instead editing /etc/sudoers file I usually create a file at /etc/sudoers.d/localusers so I edit that instead.

$ sudo visudo -f /etc/sudoers.d/localusers

Changing the default editor used for visudo

I’m a VIM user, but many of the distros default to nano for newcomers to Linux systems. You can use the following command to change the default editor that is loaded for visudo and for many other apps.

$ sudo update-alternatives --config editor