Category Archives: Development

Software or web development

byobu: properly displaying unicode characters under GNU Screen

With the need to have multiple sessions via terminal multiplexer, I’ve recently switched back to using GNU Screen rather than tmux. In this transition, I’ve noticed the following:

$ printf '%b\n' '\ue0b0\ue0b1\ue0b2\ue0b3\ue0b4'
Screenshot

Unicode characters don’t appear correctly. So I had to add the following to ~/.bashrc and restart my bash session to get it to display the unicode characters and symbols properly again.

export LC_ALL=en_US.utf-8

Now, it shows up fine.

Screenshot

This may be helpful to those who make use of special Unicode symbols, which are often non-standard, via NerdTree, Airline or Powerline VIM or Neovim plugins. This may be applicable to Nerd Font users as well.

Note: I’m using Naver’s D2 Coding Font.

byobu: switch to screen for byobu backend for multiple windows to a single server

I usually connect to a single server via PuTTY, and have three (horizontally) split sessions for logs, and another PuTTY window for sysadmin, and maybe one for coding (with multiple sessions via byobu), and possibly another one for reference. This doesn’t seem to be possible with tmux as backend for byobu.

This may be because, tmux, in spite of all the praises it receives for speed, features, and whatnot, doesn’t support multiple concurrent, but distinct sessions via byobu. I haven’t researched this deep enough to conclusively say that there is absolutely no way to do this, but I’ve found simply switching over to screen to be much easier solution for now.

byobu: number of updates available doesn’t get cleared

Environment: RHEL 7.6 (Maipo), byobu v5.73, Screen v4.01.00devel (2006-05-02)

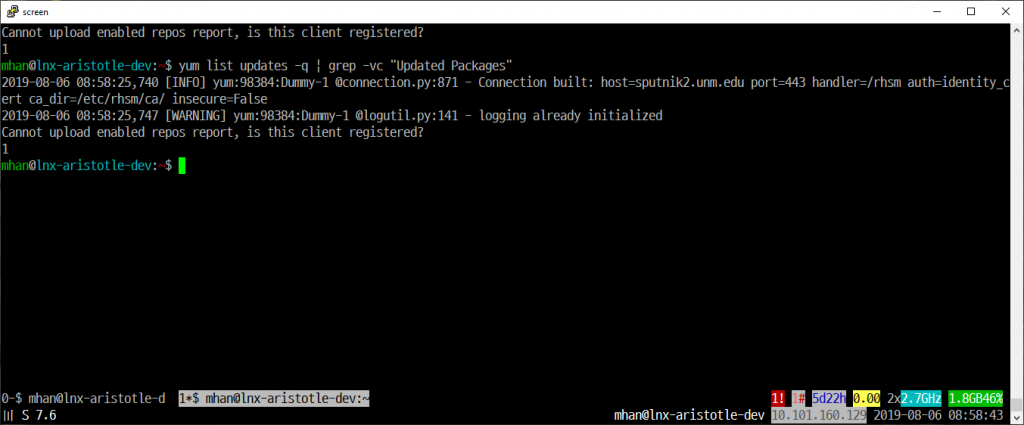
Even after a complete update of the system (via yum in this case) the number of updates available indicator on the status line on byobu doesn’t get updated. This happens regardless of terminal multiplexer you’re using (either screen, or tmux.) This indicator seems to be cached under /dev/shm/byobu-mhan-CQCSeDjp/cache.screen folder, and a very short-lived, temporary workaround seems to be simply emptying out the folder. More permanent solution would be to fix the script itself (/usr/libexec/byobu/updates_available). On line 66, the following yum command is executed:

yum list updates -q | grep -vc "Updated Packages"

That is supposed to return the number of updates available, but it only works properly when it’s under under sudo on this system. It fails with an error message when it is run with user account, which byobu assumes when this script is run:

Cannot upload enabled repos report, is this client registered?

This seems to be a message related to RH subscription manager, which is typically installed as a plugin to yum. We can run without plugins to see if it still complains:

No complaint here. And return of 0 is promising. That 1! below has been an eyesore, so for now, this will be a good enough of a fix for me. This may disable some repos that were added as plugins, and I will have to double check that some other time. Adding –noplugins to line 66 in /usr/libexec/byobu/updates_available.

ssh: putty: “Couldn’t get a file descriptor referring to the console”

Environment: CentOS 7.6.18.10, PuTTY rel. 0.71

Whenever I use PuTTY (on Windows) to connect to my CentOS box, I always get the message immediately after the authentication:

Couldn't get a file descriptor referring to the console

I decided not to ignore the message today, and figured out that setfont in my .bash_profile was causing it. I recall putting that in when I used to work from home more often and connect directly on console. Just nuke or comment out the line, and all is at peace.

ssh: “perl: warning: Setting locale failed”

Environment: CentOS 7.6.1810

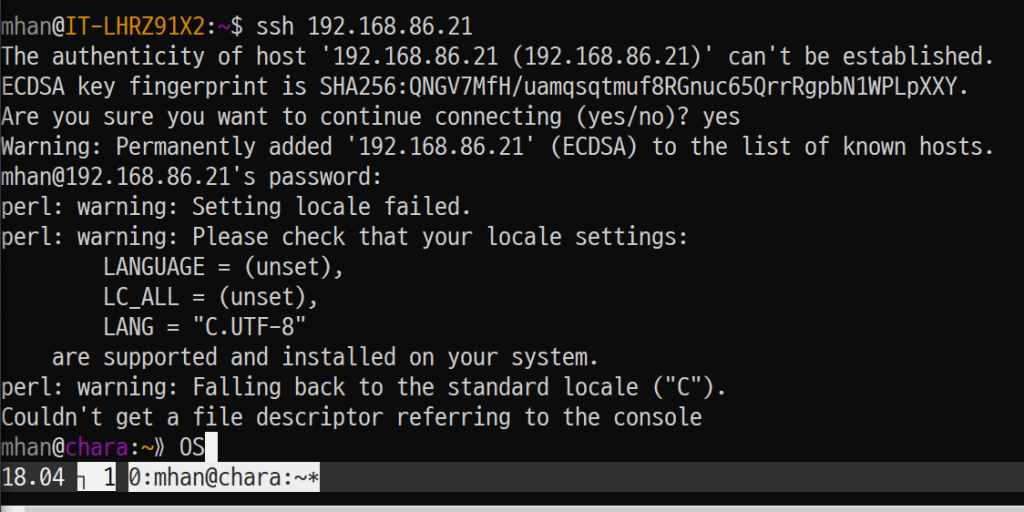
When logging in from a WSL console (Windows 10, v1809, Build 17763.615 + Ubuntu 18.04) into my CentOS box it seems to be complaining about locale settings.

perl: warning: Setting locale failed.
perl: warning: Please check that your locale settings:
        LANGUAGE = (unset),
        LC_ALL = (unset),
        LANG = "C.UTF-8"
    are supported and installed on your system.
perl: warning: Falling back to the standard locale ("C").

Screenshot:

According to this page, you can just add the following lines to /etc/environment file:

LC_ALL="en_US.UTF-8"
LC_CTYPE="en_US.UTF-8"
LANGUAGE="en_US.UTF-8"

vim-plug: git error “could not read Username for…”

When I tried to PlugInstall a new plugin called ‘talek/vorax4’, which is an old SQL*Plus IDE, git kept on returning with the following error:

x vorax4:
    Cloning into '/home/skan/.vim/plugged/vorax4'...
    fatal: could not read Username for 'https://github.com': terminal prompts disabled

Here’s the screen shot:

I had the following line in my ~/.vimrc.

Plug 'talek/vorax4.git'

Then my Google search yielded this helpful page, and it explains that this is caused by the system trying to authenticate with https with an account that has 2FA enabled.

This can be solved by forcing git to use ssh for all interactions.

Jaco Pretorius

And following the instructions there, I executed the following line:

$ git config --global --add url."git@github.com:".insteadOf "https://github.com/"

Above command adds the following lines to ~/.gitconfig.

[url "git@github.com:"]
    insteadOf = https://github.com/

However, I was getting a different error this time:

ERROR: Repository not found.
fatal: Could not read from remote repository.
Please make sure you have the correct access rights and the repository exists.

I went back to into ~/.vimrc and removed that .git extension from the plugin name, so it reads:

Plug 'talek/vorax4'

Success!

Then, after all these, I realized I could have just removed .git from the repo name without adding that line to ~/.gitconfig. 😉

Signing with a GPG key in a Git workflow

If you’re working on a project and you want to doubly make sure of your code integrity, it’s good idea to sign your work to make sure what you add to the code base is only from you and from no one else. This is particularly important in building a secure application, or if you’re a coder in a team setting.

If you have some authority over the development workflow, it may also be a good idea to adopt the team practice of signing commits even before you do a git init on a project. There are plenty of references on configuring your GPG keys, so that’s not covered here.

Get your GPG configured, and a personal key installed. Configure Git to use your personal key.

$ git config --global user.signingkey 0A46826A

Signing tags:

$ git tag -s v2.17 -m <span class="s1">'version 2.17 signed by MH'</span>
$ git show v2.17

With the signer’s public key in the keyring, you can verify the tag:

$ git tag -v v2.17

Signing commits

You can sign commits simply by adding -S once your environment is configured.

$ git commit -S -m <span class="s1">'push a signed commit'</span>

You can check and verify via git log:

$ git log --show-signature -1

You can configure git log to check any signatures and list them in output via %G? format.

$ git log --pretty<span class="o">=</span><span class="s2">"format:%h %G? %aN  %s"</span>

You can also reject commits that are unsigned and invalid:

$ git merge --verify-signature non-verify
 
$ git merge --verify-signatures signed-branch

Sign the merge commit itself:

$ git merge --verify-signatures -S signed-branch

Introduction to basic commands in PostgreSQL for MySQL users

Last tested on Ubuntu 16.04.01 LTS (xenial)

Getting into DB console.

MySQL:

$ mysql -uroot -p

PostgreSQL:

$ sudo su postgres
postgres@hydrogen:~$ psql

Creating DB

Creating a database and granting a user complete access.

MySQL:

mysql> create database mydb;
mysql> grant all on mydb.* to dbuser@localhost identified by 'mypass';

PostgreSQL:

postgres=# create user dbuser with password 'mypass';
postgres=# create database mydb;
postgres=# grant all privileges on database mydb to dbuser;

Listing DBs

You can list the DBs.

MySQL:

mysql> show databases;

PostgreSQL:

postgres=# \l

Selecting a DB

You can select a DB.

MySQL:

mysql> use mydb;

PostgreSQL:

postgres=# \connect mydb;

After selecting a DB you can go ahead and execute SQL commands.

Listing all tables

You can list tables in a DB.

MySQL:

mysql> show tables;

PostgreSQL:

postgres=# \dt

Change the password of a user

You can list tables in a DB.

MySQL:

mysql> set password for 'dbuser'@'localhost' = password('newpassword');

PostgreSQL:

postgres=# alter user "dbuser" with password 'newpassword';

Exiting from DB

Ctrl-D should exit from both.

Copying MySQL databases on the same server

Last tested on Ubuntu 16.04.01 LTS (xenial) with MySQL Ver 14.14 Distrib 5.7.13

We had to make a copy of existing databases for development app instances.  For example, a database called xp_main was for the production and xpdev_main would be for development. This depends on how date strings were created, but if you have a lot of dates in the records you may want to turn off the NO_ZERO_DATE mode.  If you don’t turn it off, the copying process can be interrupted. Go into your MySQL console.

mysql> select @@sql_mode;
+-------------------------------------------------------------------------------------------------------------------------------------------+
| @@sql_mode |
+-------------------------------------------------------------------------------------------------------------------------------------------+
| ONLY_FULL_GROUP_BY,STRICT_TRANS_TABLES,NO_ZERO_IN_DATE,NO_ZERO_DATE,ERROR_FOR_DIVISION_BY_ZERO,NO_AUTO_CREATE_USER,NO_ENGINE_SUBSTITUTION |
+-------------------------------------------------------------------------------------------------------------------------------------------+

As you can see NO_ZERO_DATE exists.  Copy paste the entire string w/o NO_ZERO_DATE.

mysql> set global sql_mode='ONLY_FULL_GROUP_BY,STRICT_TRANS_TABLES,NO_ZERO_IN_DATE,ERROR_FOR_DIVISION_BY_ZERO,NO_AUTO_CREATE_USER,NO_ENGINE_SUBSTITUTION';
Query OK, 0 rows affected, 1 warning (0.00 sec)
mysql> exit
Bye

Next, we will copy the database using mysqldbcopy utility.  You may need to install mysql-utilities package if you don’t have it available.

$ mysqldbcopy --drop-first --source=root:mypassword@localhost --destination=root:mypassword@localhost xp_main:xpdev_main
WARNING: Using a password on the command line interface can be insecure.
# Source on localhost: ... connected.
# Destination on localhost: ... connected.
# Copying database eh_bcbs renamed as ehdev_bcbs
# Copying TABLE xp_main.accesses
# Copying TABLE xp_main.accessflags
# Copying TABLE xp_main.activities
# Copying TABLE xp_main.activitytype_items
# Copying TABLE xp_main.encounter_goals
# Copying TABLE xp_main.files
# Copying TABLE xp_main.tester1_intake_subseqvisit_goals
# Copying TABLE xp_main.tester1_game_careplan_goals
# Copying TABLE xp_main.localgames
# Copying TABLE xp_main.roles
# Copying GRANTS from xp_main
# Copying data for TABLE xp_main.accesses
# Copying data for TABLE xp_main.accessflags
# Copying data for TABLE xp_main.activities
# Copying data for TABLE xp_main.activitytype_items
# Copying data for TABLE xp_main.encounter_goals
# Copying data for TABLE xp_main.files
# Copying data for TABLE xp_main.tester1_intake_subseqvisit_goals
# Copying data for TABLE xp_main.tester1_game_careplan_goals
# Copying data for TABLE xp_main.localgames
# Copying data for TABLE xp_main.roles
#...done.

That should do it!